UPDATE: A lot has happened in the past several years, and I am fighting for my sanity. Follow me on Twitter -Updated 9/24/2018
Other blog Which has been abandoned

Vegetation has always been a neglected topic when it comes to tutorials. So I have decided to give the community exactly what they have been asking for. This method makes a tree with a reasonable number of faces. (mine came out to 7,128) This allows for having multiple trees without your scene becoming too heavy. Another great thing about this method, is that you can use it in the blender game engine. If you’re not using Blender, you should be able to use the same methods in whichever program you are using.
In this tutorial you will be learning
Modeling from details first
UV Unwrapping
Creating normal Maps using xNormal
Applying Textures
First load your reference photo into the background.

Press “Shift +A” and insert a tube into the scene.


Start maping the tube to fit the trunk, and main branch.

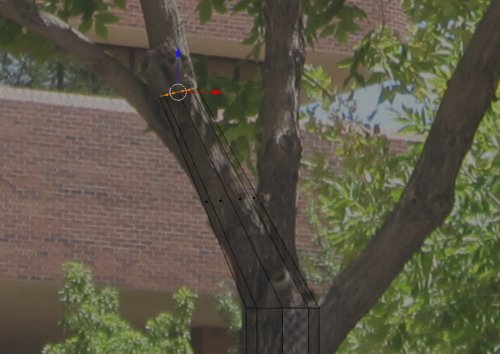

Select one segment from the main branch, and duplicate it “Shift + D”.

Use this new segment to shape out another branch.
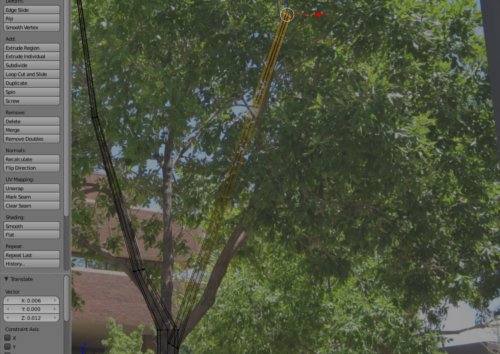

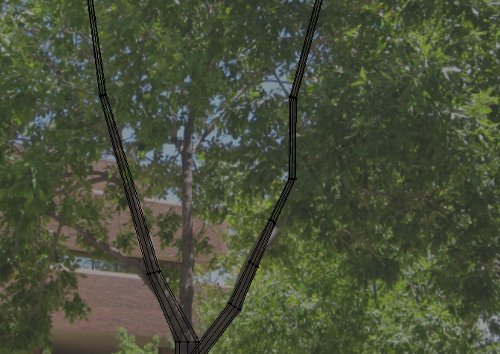
Repeat this same step for all of the main branches.

Right now, the tree looks flat. This is no good.

To fix this, start pulling around verts along the Y axis.


Another thing you can do is to put the 3d cursor at the base of a branch, and rotate along the cursor.


Repeat these same steps for all the branches.


Now we need to connect all the main branches. to do this, delete the closest 2 faces where a branch intersects.

Now insert an edgeloop with “CTRL + R”.

Now merge the outer verts together, press “W” to open up the specials menu, and select Merge.


This looks too uniform, so pull the verts around a bit so it looks natural.

Repeat these steps for all the branches.

Now we need to make the smaller branches, so add another tube.


Duplicate this branch, and place it to make a forks.

Now it’s time to UV unwrap the tree, so split the 3D view, and select the UV/Image Editor.

Make sure that the caps are deleted.

Select the edges where branches connect, as well as an edgeloop running down the branch, and mark seam by pressing “CTRL + E”


Now select all, hit “U” and select unwrap.

Change the Viewport Shading to Textured

Right now our UV’s are too small, so scale them up.
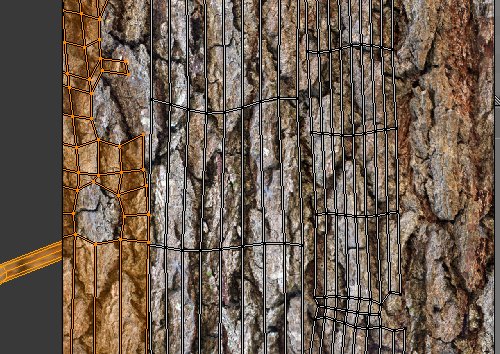


Some of the UV’s may be stretched, so edit them to make the bark texture a little more uniform


Repeat these last few steps for the small branch that we made.

Now on to the leaves. Load up a photo of a small leaf cluster into Gimp or Photoshop.

Crop and scale the leaf cluster into either 512X512, or 1024X1024

Mask out your leaves from the background.

With this mask you can easily make your color and alpha map.

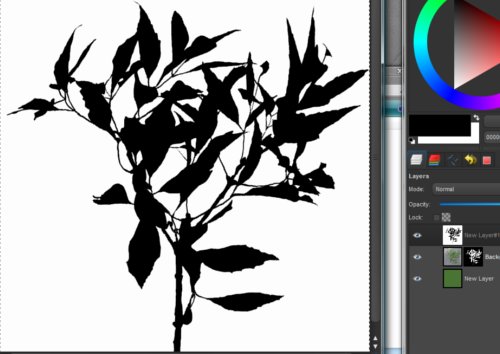
These next new steps are optional, but making a normal map for your leaves will really help push this to the next level
In a new scene, Create a plane.
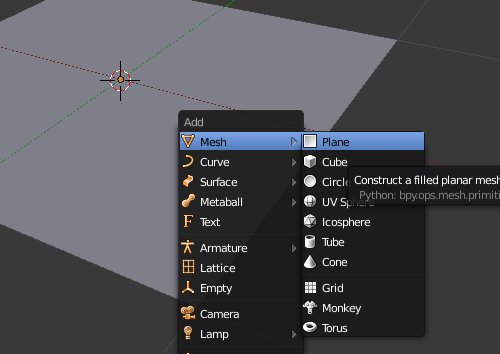
Split the view and open the UV/Image Editor.

Create a new material, turn on Z Transparency, and change the alpha value to 0.


For your alpha map, uncheck Color. Check Alpha, and change the value to -1.

In the 3D view, change the display mode to GLSL, and change the Viewport Shading to Textured.
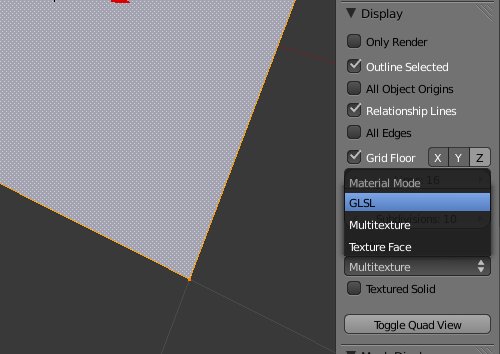

Add a Multires Modifier, and set the levels to 8.


Now go to Sculpt mode, and sculpt the plane to give the leaves some depth.


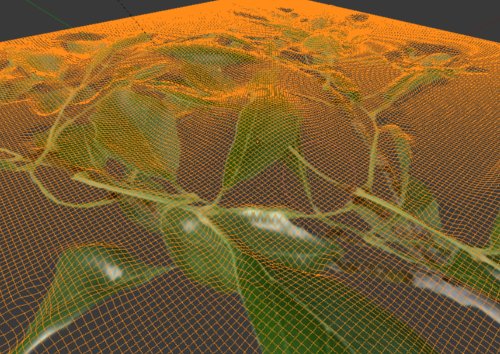
Duplicate your plane with “Shift + D” On one copy apply the modifier, on the other turn off the modifier.
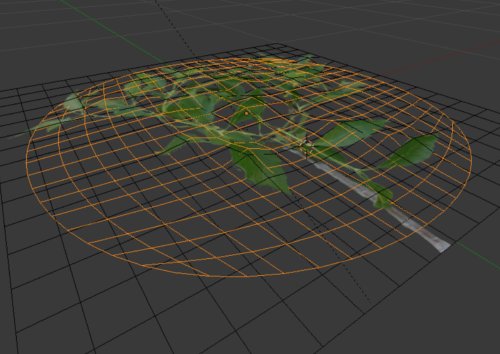

Export both of your planes as .obj.

In Xnormal, import both your low poly plane, and your high poly plane.


In Baking Options, chose where you want to save your file to, then Hit the Generate Maps button.


Load up your bark texture into Gimp, or Photoshop, and desaturate it.


Apply a slight Gaussian Blur, Adjust the levels like so, Then Invert the image.


In Xnormal, click the “tools” tab, then “Hightmap to normal map”

Right Click in the Hightmap window, load your new bark texture. Then In the Normal map window, right click and select Generate.


Now right click, and save your normal map.

Now go back to your original scene file, and add a plane. Open your leaf color map into the UV/Texture Editor, and unwrap the plane.

Move the object center to the start of the twig.

With the face selected in edit mode, open the “specials” menue by hitting “W” then select “Subdivide”.

Move the verts around so this plane does not appear flat at any angle.

Add a new material to the plane. Enable z Transparency, and set the alpha value to 0.


Load your Color map to the UV coordinates.

Check the Specular Color box. This will make the specularity look much more realistic.
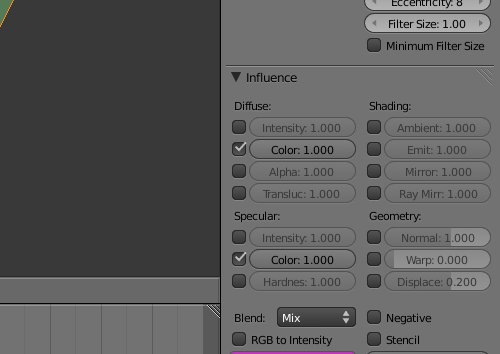
For your Alpha map, check the Premultiply button, as well as the alpha button, and setting it to -1.

For your Normal map, make sure to check the normal map button, and that you change the Normal Space to Tangent.
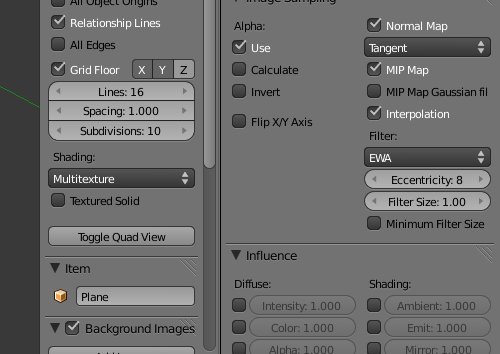
Repeat the same few steps for the Bark. (excluding the part on alphas)

To get a better view, of how the normal maps react, change the point light to a sun, and give it a slight angle.
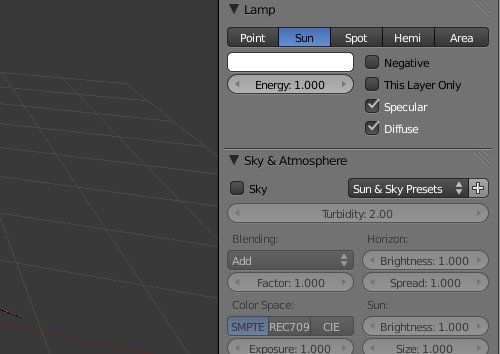
To make the leaves double sided in the game engine, change the engine to “Game Engine”.
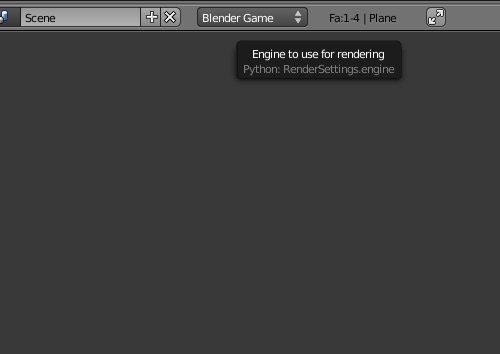
Now in Edit mode, select one face on the plane. In the Object Data Tab under Normals, check “Double Sided” In the same tab under Texture Face check “Two-side” as well as changing the transparency to Clip Alpha.


Duplicate the leaf cluster and position it onto the small branch.

Keep doing this as many times as you feel the need. Try to position them in such a way that gives good volume without the need for ridiculous amounts of leaves.

Now join all the leaves to the branch, and move the pivot point to the end of the branch.

Now place the branch onto the main branches of the tree, and duplicate until the tree is full. Then parent all the branches to the tree with “CTRL + P”.


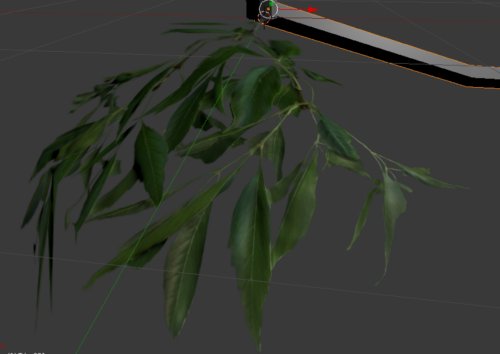
Now put it in a scene, and you’re done! (This image is from the Blender Game Engine)

Here is a turntable of the tree
Download the finished .blend here
Also, post your creations. I want to see what you guys come up with!

Medium Poly Tree by Bryan Tenorio is licensed under a Creative Commons Attribution-NonCommercial 3.0 Unported License.



Nice tutorial! Thank you, it pushed my knowledge to another level, just by having some details! 🙂
But one thing, why don’t you bake your normals in Blender? It would have a feeling 🙂
LikeLike
Thank you. The reason I didn’t bake normals in blender are two fold. One, the version of Blender I was using at the time kept crashing while trying to bake normals ( and I didn’t feel like waiting for it to get fixed) and I wanted to help people who aren’t using Blender to follow along.
LikeLike
hello I’m from rio de janeiro Brazil and I saw your tutorial but could not find the reference image to follow the tutorial you can pass the link where you got your reference image?
LikeLike
Hi. I’m sorry, I would send you the link, but I took the reference photo myself. If you don’t have a camera, you can find a lot of good tree reference on google, and flickr!
LikeLike
Do you know where i can find the images for this? thanks!
LikeLike
I took them myself. I’m sorry. I should have mentioned that earlier.
LikeLike
very helpful. specially the normal map on the leaves by sculpting, because it make the leaves dont look flat. thank you so much… it help me
LikeLike
What view should It be in when I add the backround image or does it matter.
LikeLike
I would say Front view. side view is good too. You just don’t want to put it on the top. Because then you’ll have a sideways tree.
LikeLike
You should do this in either the front view, or the side view.
LikeLike
I can’t download the “.blend” file… I’m interested with your creation. 😀
LikeLike
could u say how to do it entirely with blender? id rather not download any more programs onto my stone age cpu. thx
LikeLike
HI
nice tutorial . I am hobbiest and making trees for video games.
I want also ask you for advice .
Please can you advice good lcd monitor for graphics work ( hobby work ) cheap and good TN technology , size 22,23,24 ( sufficient is 22 )
Display shoul be sharp, good colours
Thanks and sorry for my question , this is not spam, only searching for good thing for hobby graphics
LikeLike
It sounds like you already know what you want. Any monitor should be work.
LikeLike
Well it would help if you could at least tell us where to start by placing the background image..lol i do even see the option you have in your first screen shot? you don’t say what mode it’s in or anything?.what are we supported to be mind readers now. i am sure the rest of the tut is fine.. but i have looked for over an hour and see absolutely now where to add the background image like you have it along with how your screen shot is.
LikeLike
FINALLY…a thorough tutorial on modeling vegetation! One question, I live in an area where there are many trees, in fact we have over 100 of them in our 4.5 acre property. The tree I want to model is called a Sycamore, the bark textures for this tree is very challenging the way you put it (its multicolor.) any other ways you know for a “pattern” style trunk?
LikeLike
I’m sorry, I don’t quite understand what you’re asking. I tried doing a search for sycamore trees, and I came up with a variety of different trunks. most of them looked normal, but a few were weird. Maybe the best way would be to model the trunk separately, and not rely too much on the texture by itself.
LikeLike
HOW DID YOU MAKE THE GRASS PLEASE I NEED HELP!!
LikeLike
so do i….
SOMEONE RESPOND
LikeLike
HOW DID YOU MAKE THE GRASS PLEASE I NEED HELP!!
great toutorial
LikeLike
Please forgive me for the late reply. I made the grass by first using hair particles on a small plane to make 3D grass.Then after tweaking to get it the way I liked, I rendered a still shot from an orthographic view, and saved it as a .png. I then applied this ‘texture’ to a plane (the same way I did the leaves) Now that I have this grass plane, it’s just a matter of placing it in the scene! usually people make X shapes with grass planes.
LikeLike
This looks fantastic! I’ve been looking all over the place for a good tree model. Thank you very much 🙂
LikeLike
You’re very welcome 🙂
LikeLike
HI IM A KID HOW KNOWS A LITTLE ABOUT BLENDER… AND CAN U GIVE ME A SIMPLE PLANT THAT IS OT HARD… AND I AM VERY INTERESTED IN ANIME.. BUT I LIKE TO ANIMATE.. SO I LEARNED FLASH.. AND THEN I SAW THIS BLEDER CAN YOU HELP BEGIN MY JOURNEY… ANYWAY IM A FILIPINO
🙂 PLSSS
I JUST TURNED 12 THIS SEPT. 8 2011
LikeLike
I had seen a couple posts on here regarding not being able to get the background image to show. I followed your instructions on the post by clicking “n” and selected the image file, but still no background image. How do you get the background image to display?
LikeLike
Make sure that you’re in an orthographic view by pressing “5” on the numpad. Also, check which view you have selected. It should be all views by default, but if you accidentally selected something such as “back” then you wont see it in any other views except for the back one.
LikeLike
Hey. thanks for the great tut. I do have one problem though. I cant find the the texture face panel at the end of the tutorial. It just isnt there, even though I got one of the faces of the leaves selected. Also how do I post a comment without replying to somebody? 😛 Thanks!
LikeLike
very gooood! do you have more environment tutorials? like making grass for the GE?
LikeLike
you’re awesome.. are u a Filipino?..
LikeLike
That is so cool! Could you by any chance do a horse? I REALLY need to know how. And also wings.
LikeLike
This is a great tut but I still cant get the leaves to show up. I do get the outline of the leaves but not the color image. The part of the tut that explains how to make the alpha mask is kinda vague for us noobs…any chance you could show how to do it with Paint.net or gimp?
Any help would be appreciated. Ive watched dozens of vid tuts and cant find any that explain it well enough for real beginner…
thanks again!
LikeLike
@nick: alpha maps are basically images from which blender takes b&w intensity and converts it to alpha: black is completely transparent, white is completely visible. You can invert the bw channel of your image by checking the “negative” button under the “influence” panel in the “texture” menu, or simply set in the same panel the “alpha” intensity to -1. You can also avoid to use an alpha map and take the alpha values from a color map with alpha (for example a png). Even in this case you shall check “alpha” under “influence”. Remember that in the “material” menu, “transparency” panel you must crank down the alpha value to 0. For a correct visualization in the viewport and in the game mode, set the display mode in the right bar (the one that appears pressing “n”) from Multitexture (default) to GLSL.
That’s not much, but I hope it can help!
—————–
Thanks for the great tut, Brian! I found it very useful, and I like very much your way to achieving vegetation rendering!
LikeLike
Porphyry, thanks for the explanation…
I actually found another tut that showed the settings for each of the textures and they are different than shown here and they worked for me. Im not sure why but Im glad that they did…
thanks again!
LikeLike
Bryan, your tree is great and the level of detail you provide is awe-inspiring.
It is worth mentioning that today we can save much time on tree construction by using the marvellous Add-on Sapling that appeared in 2011.
Time can then be spent on the textures.
LikeLike
ugh this is confusing to me as i have a much newer version of blender whilst you have an old version but thanks anyway for this good tutorial
LikeLike
thank you to master the tutorial , really helped me to explore on the blender , but I have been looking for a complete tutorial with the function of kaypad and menu2nya … , whether the host can provide the formula and the tutorial is to explore the development of my blender , thanks in advance , respect of my ponadi ( newbye ) .
LikeLike
HUFT very sad , no response from the host , I’m really hard on how to design their leaves , rather I did not try , I have tried to use the photograph shop with the extension png is transparent , but when I call use the blender , not at all transparent or follow pieces of leaves but still look the leaves with his four terms , help me once again how to create and display a leaf to follow the cuts .
LikeLike
please sir , anyone who wants to study, teach me how to display the piece of leaf with transparent side in blender software , just like the example above , I have tried to show various images and apply the objeck , all successful , cuman one who still makes me overwhelmed of getting rid of the leaf -cutting results .
LikeLike
Otimo tutorial, estou fazendo tcc de animação no blender, este tutorial me ajudou muito. Obrigada
LikeLike
thanks man 4 all your tutorials you are a smartest person !!! nice day !!!
LikeLike
Hats off!
A tutorial to be studied carefully: thank you!
Now, for Mac Blender users, in particular:
xNormal requires Windows OS, but,
is it true that its functionality is already present in Blender, by way of “Render Baking”?
Even to the point that the algorithms used by Blender and by xNormal
are both based on the same thesis, by Morten S. Mikkelsen ?
LikeLike
Hola man, excelente trabajo. Quisiera saber como hiciste la hierba y ese magnifica puesta de sol, podrías hacer un tutorial sobre eso.
LikeLike
Fantastic tutorial,thanks a lot.
LikeLike
thank you so much for the how to, especially the plane foliage 🙂
LikeLike
Where Is The Tree BluePrint?
LikeLike
that’s so awesome man thanks.
LikeLike
this might seem stupid, but I can’t open an image for blender.
LikeLike
Make sure you have a version of Blender like
Blender Foundation 2.62 (last one before BMesh) or later.
The official Blender documentation has improved markedly this year.
LikeLike
Reblogged this on golBBlog and commented:
For 3D buffs like me
LikeLike
Hi! Very nice tutorial, I made a tree using a similiar method.
Check it out:
http://ubuntuone.com/6M2jateHxj6urKwAyydj5I
LikeLike
how can i download the xnormals?
LikeLike
liking your tree very much thanks for tut 🙂
LikeLike
For the leave textures I used this tutorial: http://www.youtube.com/watch?v=AnbxtMCHKV0
It’s way faster than drawing the mask. Anyway, great tutorial!
LikeLike
Awsome tutorial. Thank’s for idea.
LikeLike
I really tend to go along with every little thing that has been
written throughout “Tutorial: Realistic Medium Poly Tree | Scotchtapeworm3D”.
Thanks for pretty much all the advice.Thanks-Percy
LikeLike
Alt LMB is used for changing the angular view on two angular axes of the 3D View window, if Alt LMB moves the current window, then there’s a conflict with your window manager. You can resolve the conflict or use Ctrl Alt LMB or MMB instead (Also, you may have activated Compiz->Rotate Cube. Default configuration for rotating the Cube is also Ctrl Alt LMB ; you may have to change this binding to an alternative configuration.). If you are running KDE this can be resolved by: RMB on the title bar of the main Blender window → select Configure Window Behavior → go to Actions → Window Actions → in the Inner Window, Titlebar and Frame section → select the Modifier key to be Alt and set all the select boxes beneath it to Nothing. An alternate method within KDE might be to RMB click on the title bar of the main Blender window; then select Advanced → Special Application Settings… → Workarounds and then click Block global shortcuts with Force selected and checked.
LikeLike